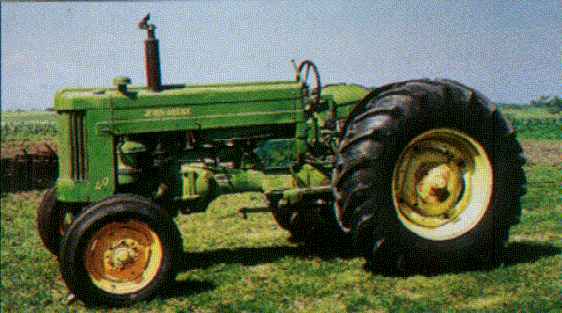
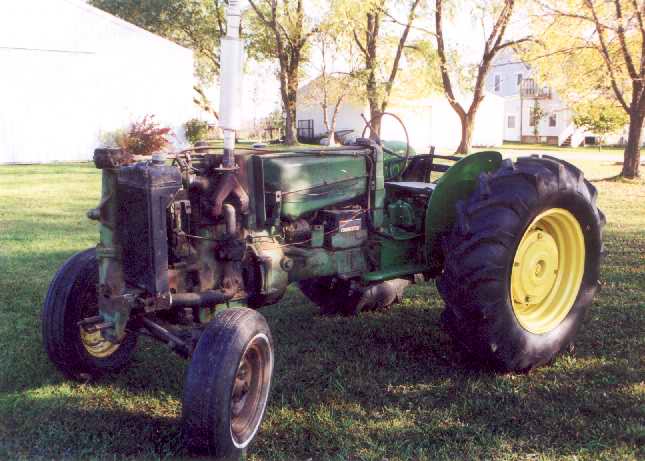
 This picture was scanned from a magazine, and is a
fairly decent picture of what a 40U should look like.
This picture was scanned from a magazine, and is a
fairly decent picture of what a 40U should look like.1955 John Deere 40 Utility
Repair and Rework
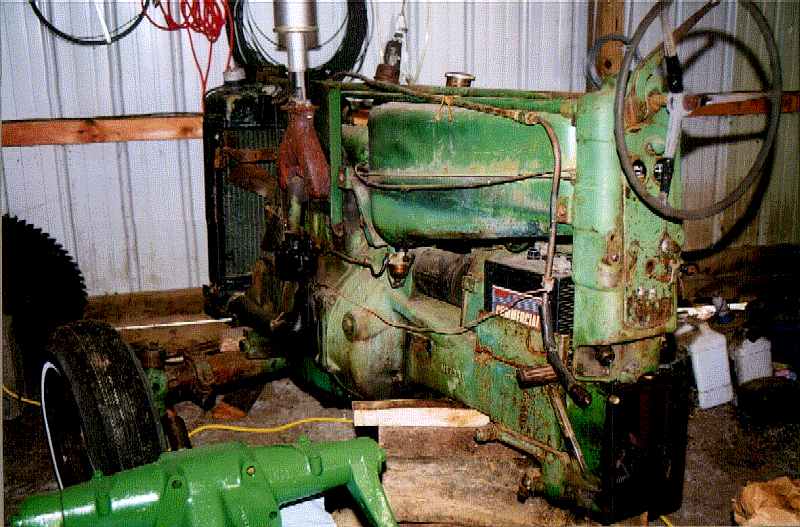
This is my project tractor. It is a late model 40 Utility gas. The serial tag is gone, and I have not yet researched getting a new tag based on the block number, though that will be forth-coming later this year. I do know it is a late model 40U, based on the parts book and the configuration of the drawbar.
I purchased this tractor in June 1998 for $1600. It came out of Canada (came back home), and was in rough shape. Dummy me, I did not get any pictures prior to starting work on it!
This picture was scanned from a magazine, and is a
fairly decent picture of what a 40U should look like.
When I got the tractor, everything worked - it was running, the hydraulics went up and down, and all the gears worked. However, there was a noise in 1st and 3rd that sounded like a chipped or broken gear, and the engine smokes. Also, the brakes didn't hold very well. Time to tear the back end down.
July 1998 - After tearing down everything behind the dash, the following problems were found: apparently one of the transmission bearings had disintegrated, allowing the rollers to go all through the transmission. Three teeth had been broken out of the main cluster gear on the input shaft, the rollers were all caught in the oil channel cast into the side of the transmission housing, the pinion gear teeth were worn to razor edges and two of them were partially broken off, and the ring gear was pretty well chipped up. Also, the differential quill seals were shot, allowing trans fluid to dribble all over the brakes.
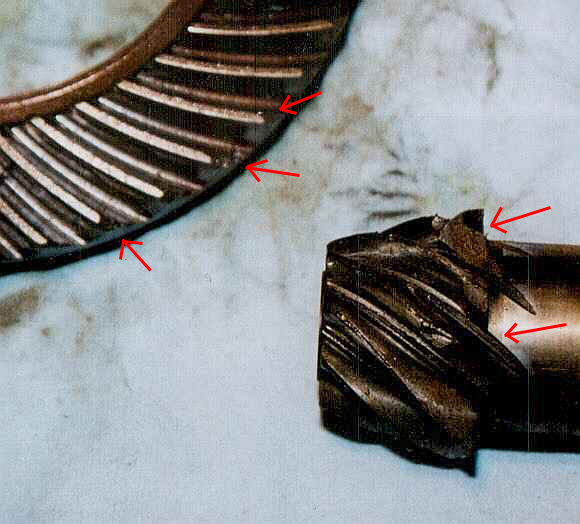 This shows the old ring and pinion. Arrows
point to broken and chipped teeth. Also, notice how sharp the
pinion teeth have been worn. ==>
This shows the old ring and pinion. Arrows
point to broken and chipped teeth. Also, notice how sharp the
pinion teeth have been worn. ==>
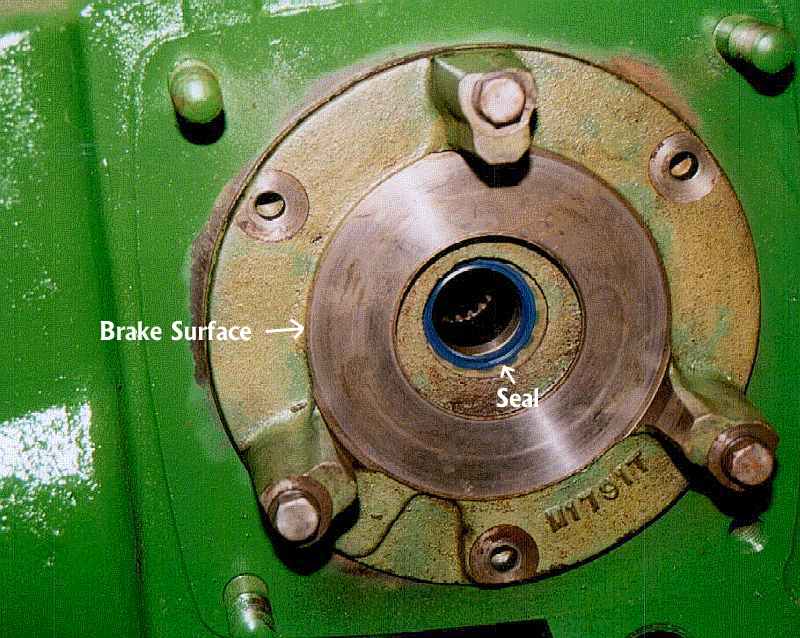 <==Here is one of the
differential quills after cleaning it up and installing a new
seal. As you can see, there are still three bolts to put
in. This also shows one of the brake surfaces.
<==Here is one of the
differential quills after cleaning it up and installing a new
seal. As you can see, there are still three bolts to put
in. This also shows one of the brake surfaces.
August 1998 - Two of the gear teeth were found at the bottom of the transmission. With the help of an expert welder (found through some connections), the two teeth were welded back in place, and the third tooth was built up and ground to shape.
September/October 1998 - While waiting to get the money for parts, I have been cleaning and painting the transmission case and hydraulic unit.
November 1998 - It's been a very busy fall, and funds have been tight. But I finally located a used ring and pinion (they must be a matched set) for $215. That, plus another $190 for various seals, gaskets, brake parts, etc. and I am ready to put the transmission back together.
December 1998 - The transmission is back together and ready to put back on the tractor.
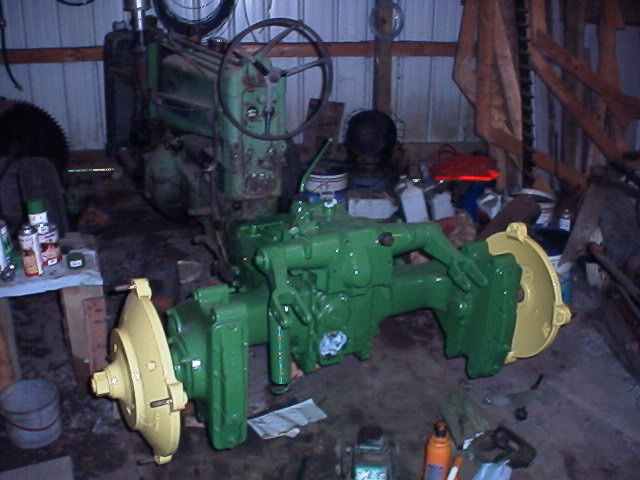
 <== The transmission is back together and ready
to be bolted back onto the tractor. The arrow points to the
welded-up gear tooth.
<== The transmission is back together and ready
to be bolted back onto the tractor. The arrow points to the
welded-up gear tooth.
 Here is a closer picture of one of the repaired
gear teeth.==>
Here is a closer picture of one of the repaired
gear teeth.==>
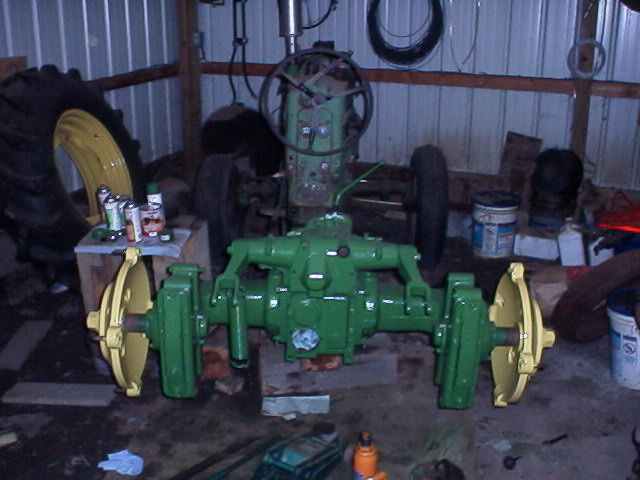
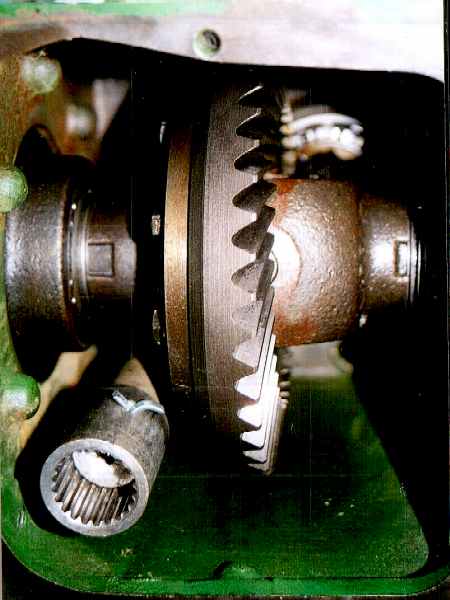 <== The differential has had the new ring gear
installed, and the differential unit has been reinstalled.
<== The differential has had the new ring gear
installed, and the differential unit has been reinstalled.
 In
the mean time, here sits the rest of the tractor (Christmas Day,
1998). The rockshaft housing has been repainted and sits in
the foreground. ==>
In
the mean time, here sits the rest of the tractor (Christmas Day,
1998). The rockshaft housing has been repainted and sits in
the foreground. ==>
February 20, 1999 - Just a short update note. Quite frankly, I
have not made any progress on my tractor since the last update. When
you live in the Michigan Thumb area and have an unheated shop, winter
slows down progress. Also, because I am trying to clean, sandblast, and
paint as I go, any weather below painting temperature slows me down. If
I were only repairing things, it would be a different story. Probably
the pace of things will pick back up around the end of March.
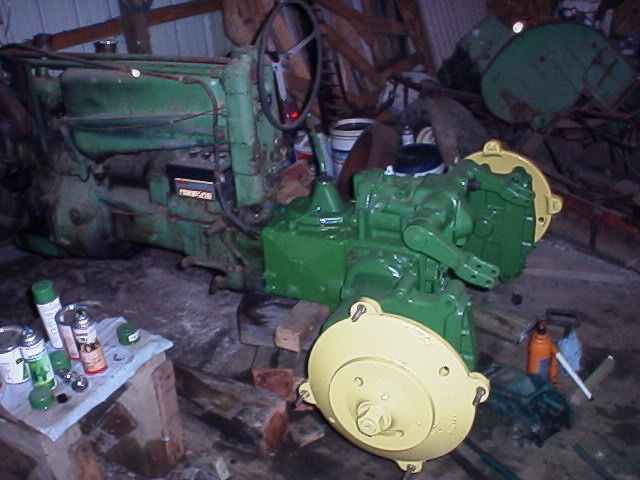
April 12, 1999 - As I indicated earlier, once the weather broke, things would start picking up again! I took two buckets of bolts and small parts, all covered with grease and oil, over to the shop of a friend who has a part washer. Parts cleaned up very well. Sandblasted and painted rear transmission cover. The cover is not in the best shape. It looks like someone really worked at getting the PTO out of it at one time and cracked the casting very badly. It was brazed together and did not appear to be leaking before disassembly, so I will reuse it. Got the transmission bolted back to the front of the tractor.
May 6, 1999 - Bought some sand tonight for the sandblaster. Blasted and painted one of the rear housings. Hope to do the other tomorrow night. New shift lever arrived today. Comparing this one to the old one it looks like the original broke, and someone welded a short straight lever to the bottom end. This worked, but left the end of the shift lever too close to the steering wheel. This made for a pinching hazard when turning, as I found out the first time I drove the tractor.
May 7, 1999 - Didn't get the other housing done tonight, but did get the transmission cover assembled, blasted, and painted.
May 8, 1999 - Put the painted housing back on the tractor, as well as the transmission cover, the hydraulic unit and the rockshaft.
May 9, 1999 - Blasted and painted the other housing and the wheel weights. It's starting to look like a tractor again!
May 10, 1999 - Got the other rear housing back on. These things are HEAVY!
May 11, 1999 - Painted both the rear wheel webs.
May 15, 1999 - Got several parts cleaned, blasted, and painted including the anchor yoke assembly, the fender brackets, the anchor yoke control arm, and the return spring.
May 20-22, 1999 - All the drawbar assembly parts have been cleaned, blasted, and painted. Several of the brake parts have been as well. One of the brake pedals needs to be heated and bent back into position.
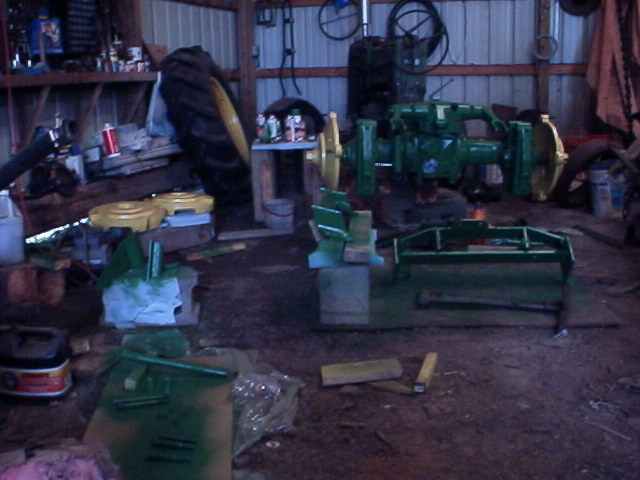
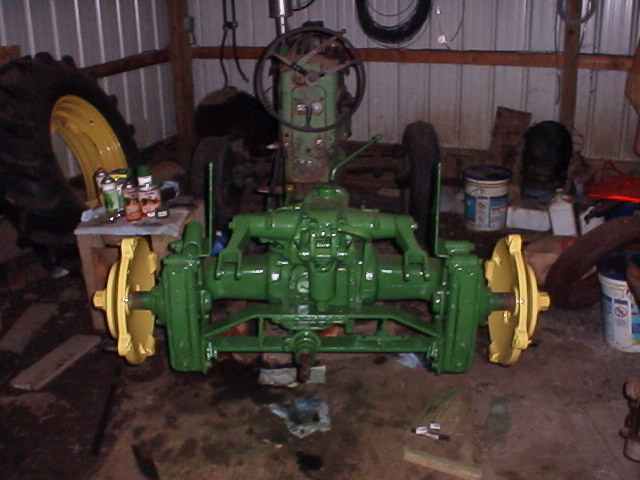
May 23, 1999 - New pictures! Here are some shots of the
tractor as it sat this afternoon. There is also a general picture of my
shop, showing several of the painted parts ready to go back on. My shop
may not be the biggest, cleanest, most organized shop you've ever seen
(far from it), but I know where everything is, I can do what I need to,
and it's in my back yard. Enjoy the pictures! (As usual, click on any
thumbnail for the full size picture.)
 |
 |
 |
 |
May 29, 1999 - The anchor yoke, drawbar assembly, PTO shaft, and brake locks have been reinstalled. I've chosen to buy some new grade 5 bolts rather than reuse all the old ones. Some of them are in pretty tough shape.
 May 31, 1999 - Drained and refilled one of the rear
housings. Filled the transmission and found a leak at the base of the
rear transmission cover. As mentioned earlier, the cover had been
cracked and brazed. Consequently, it is also a little warped. Had to
drain the trans, remove the PTO shaft and rear cover, clean everything
up, and apply a liberal amount of Form-A-Gasket in addition to the new
gasket. Reassembled everything and no more leak. (NOTE: If you are
doing this, my suggestion is to fill the trans prior to installing the
drawbar assembly and anchor yoke. The yoke and drawbar assembly were a
pain to work around in removing and reinstalling the PTO shaft and rear
cover.) The hydraulic lines have been reattached. Now, with a little
hydraulic fluid and a battery charge I can start her up again without
creating a mess.
May 31, 1999 - Drained and refilled one of the rear
housings. Filled the transmission and found a leak at the base of the
rear transmission cover. As mentioned earlier, the cover had been
cracked and brazed. Consequently, it is also a little warped. Had to
drain the trans, remove the PTO shaft and rear cover, clean everything
up, and apply a liberal amount of Form-A-Gasket in addition to the new
gasket. Reassembled everything and no more leak. (NOTE: If you are
doing this, my suggestion is to fill the trans prior to installing the
drawbar assembly and anchor yoke. The yoke and drawbar assembly were a
pain to work around in removing and reinstalling the PTO shaft and rear
cover.) The hydraulic lines have been reattached. Now, with a little
hydraulic fluid and a battery charge I can start her up again without
creating a mess.
June 1-6, 1999 - Kind of putted around most of these evenings. I was anxious to get the old girl started again. I haven't heard it run in almost a year. Tried charging the battery, but didn't seem to take a charge. Then took off terminals, cleaned them, and VOILA! Lots of battery power. But still couldn't get her to spark. Then I remembered that when I bought it, a jumper was run between the starter switch and the coil in order to get spark. Shut-off was accomplished by removing the jumper. Obviously rewiring is in order. And if you could see what I see, an engine and carb rebuild is also appropriate. The carb will happen soon, but the engine will wait until winter.
Rewired the tractor and introduced a keyed ignition switch in place of the jumper. All wiring was done following in the wiring diagram in the electrical service manual. The one addition is the switch. Not quite original, but cheap and actually more secure. But now my charging system does not appear to be working. It was working before, but I also don't trust how it was wired before.
By running a jumper between the "F" generator terminal and ground, and observing the ammeter show a charge, I determined that the voltage regulator is bad. Time for a new one.
Also blasted and painted the wheel weight bolts.
June 20, 1999 - Well, I've been slowly picking at bits and pieces of this. I've had to get going on a major house painting which is currently absorbing most of my time.
But the wheel weights are back on. I took the brake pedals over to my friend Scott at Vintage Tractor Sales. We heated them up and straightened them out. Scott also ordered my regulator and carb kit. Scott can get lots of tractor parts as he is both a Herschel-Adams and Riley Tractor Parts dealer.
July 17, 1999 - Sorry I haven't been here lately. I haven't gotten a thing done on the tractor. All time has been taken up with house painting (see "current events" for more info). The house painting will probably take until Labor Day or so, so don't look for much additional information here before then. Sorry.
January 1, 2000 - For those of you who have been looking for more information here, I haven't forgotten about this tractor! Our house-painting project took right up until Thanksgiving, and there hasn't been much time to work on it since then. (My wife knows I am building up some serious shop time here!) Look for more information to come soon.
February 27, 2000 - Back in the barn for the first time in months! (or at least the first time for working on the tractor. The chickens are in here, so I'm in the barn frequently. Everything is covered with chicken dust!)
Taking a look at the generator today. Started up the tractor to let it run for 10 minutes or so. No charging is evident. put a few drops of oil on the commutator. A friend suggested that this works about 30% of the time. Well, this was one of the other 70%. Tried dismantling the generator. Screwed up the threads by the belt pulley, so will have to get that repaired. Commutator and field coils tested okay, but can't get the generator to "motor" or charge. Time to take it to the pros. I'll do that when Joey says I can pay for it.
March 4, 2000 - With the dust on the tractor, it's easy to see where the oil leaks in the back end are. Headed to Nolans and bought some oil seals. Some have to be sent. Put a new seal at the end of the PTO shaft tonight.
March 8, 2000 - Received the remaining parts I purchased on Saturday. Decided to replace the seal and plug on the Touch-o-matic as that ought to be quick and easy. Snap ring didn't want to come out and I struggled and strugg...PING!...and away it went. Could not find it. Oh well, that can't be too expensive to replace. Put the new plug and seal in anyway.
The new plug has a groove around the outside edge to hold the o-ring. The old plug did not have such a groove. That is why they have to be replaced as a pair.
Decided to remove the arm off the rockshaft where it was leaking a little. Took the bolt out and hammered on the end of the rockshaft (using a large steel rod and heavy hammer), but couldn't get the arm to budge off the splines. Sprayed on some WD40 and left it for another time.
March 18, 2000 - Over the last several days I've occasionally gone back out and hammered on the end of the rockshaft. Tried heating the lift arm with propane. That seemed to help and the arm finally came off. However, the rockshaft would not come out.
Went back to the service manual (where I should have started). The rockshaft comes out by driving it out the right side. That means I have to remove the LEFT lift arm. So I started the process over. I wasn't getting anywhere. A friend suggested using Mapp gas instead of propane. So I went out and bought a Mapp torch ($40). Worked much better! A few more hits and the lift arm came off. I drove out the rockshaft, changed the left seal, put the shaft back in, and installed the right seal. Cleaned up the lift arms and put a coat of paint on them. They'll go back on a little later.
March 25-27, 2000 - Scott and I went to Don King's big auction in Columbia City, IN over the weekend. I bought a couple of replacement knobs that I need. Decided to make the short shift lever right! I broke off the old knob that wouldn't screww off and was too big anyway. Heated the end to get the threaded portion of the knob off. Then I heated up the ball (pivot point) and filled in the notch with a brazing rod. I'm going to recreate the notch closer to the measurements of the pin that sits in the notch. I'm also going to braze in and redrill the hole in the transmission cover that the pin rests is. There is entirely too much slop in the shift lever and I'm going to attempt to get rid of it.
May 14-15, 2000 - No, I haven't forgotten about my little tractor. Just too many other things that had to be dealt with first.
I brazed in the hole and attempted to drill out the proper size hole. However, the brazing didn't hold. I guess I hadn't gotten the metal hot enough. So instead, I tapped threads into the hole and inserted a bolt. I ground out the notch to just fit the end of the bolt, and it all fits very well. I've got to clean up the cover now and repaint it, but everything is looking good for a tighter shift lever!
June 1, 2000 - Well, the end result of the shift lever is certainly better, but not quite as tight as I'd hoped. There are two parts that are still loose. First, the area where the pivot ball sits has worn, so the bearing that rests on top of the ball is not as tight as it should be. There is about 1/8" to 3/16" of up-and-down movement. Second, the shift forks themselves have worn, leaving extra room between the edge of the fork and the bottom of the shift lever. I might try to do something about some of the up-and-down movement, but I'm not going to completely dismantle the shift cover at this point. It definitely is better than it was before, and looks good as well.
June 7-8, 2000 - I bought some more sand and blasted the brake levers. Put two coats of paint on them.
July 7, 2000 - I've been working along on the tractor trying to make a little progress every few days. The brake levers have been put back on, though the adjusting nuts are not yet on. As the fender/platform for that side is not yet complete, I don't have anything to hang the levers from. The Touch-o-Matic control has been broken down, sandblasted, painted, new parts put on where needed, and reinstalled on the tractor. The left fender/platform has been sandblated and just received its third coat of paint tonight. Will probably receive one more before it's done. And the left side of the three-point hitch has now been disassembled, sandblasted, and painted.
November 1, 2000 - No, my project hasn't stalled, though I haven't been very good about keeping this page updated!
I've made progress on this all summer and into the fall. I continued blasting and painting the 3-point hitch parts, the fenders, got the brake pedals hooked up and the brakes adjusted, put the rear wheels back on, and generally put the whole back end together. On October 20, I drove this tractor out of the barn for the first time in over two years! Boy, did that feel good! The hydraulics work well. The trans still has a slight clunk in 1st and Rev., though not the same as it was before teardown. I'm wondering of the welded in tooth is just slightly out of profile. I'll eventually have to pop the top off the trans and take another look.
I've purchased a new seat and put that on. Man, does this feel good! I took some pictures but haven't had them developed yet. I'll get them posted once I do.
Now to start making plans for the winter engine teardown.
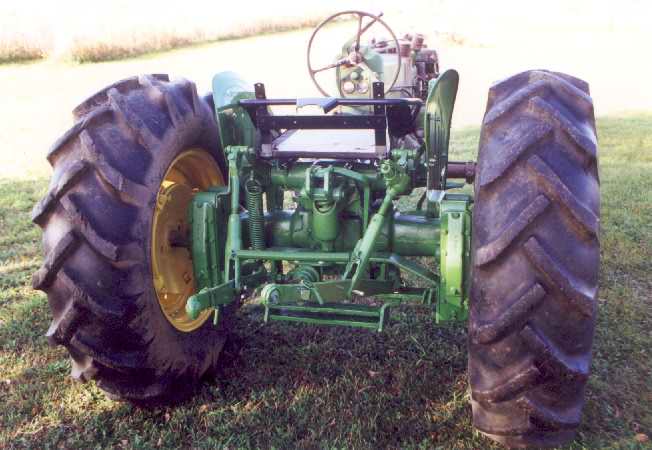
November 19, 2000 - Here are a couple of the pictures I took
on October 20.
 |
 |
March 24, 2001 - Not much has gone on during the last month or so, but during the winter I have taken the engine off and torn it down to a bare block. I believe I now know the cause of my low compression/smoking problem. The ring end gap, instead being the prescribed 0.010-0.020", was closer to 1/2"! Other indications would lead me to believe that someone simply installed the wrong rings at some point.
September 2, 2001 - No, I haven't forgotten or given up on my project. But I have had some delays. This spring was spent installing a new wood stove (which included redecorating the room, building a hearth, getting the chimney relined, etc.) Then I have been collecting wood during the summer as time has allowed. I certainly haven't spent as much time in the barn as I'd hoped.
But that is what also can make this a fun project. Working on it as time is available, making sure I'm happy with the results!
Getting back to the block, I reamed the ridge out of the top end of the cylinders, and was very happy to find that there was not much wear in the cylinders. Honed the cylinders and found out I had a few problems. There was (what I thought) minor pitting in the upper cylinder walls. After honing and cleaning the cylinders, it was very obvious that water had been allowed to seep into the top half of both cylinders, causing pitting down the sides, and causing a ring of pitting where water had settled on top of the pistons. This may have been the reason for the previous ring job.
After consulting with my mechanic advisor (and best friend) Scott of Vintage Tractor Sales, we decided the best course of action was to have the block ground up the next size, which is 0.045" over. Also, the crank had some minor scoring which also needed to be cleaned up. Scott made arrangements to have the block and crank taken to the guy he relies on for machine work. The crank was ground 0.010" and looks like new. The block has been ground 0.045", the rods reconditioned, and new bearings, pistons, and wrist pins have all arrived. The block was hot tanked, requiring removal and replacement of the cam bearings. I pick everything up tomorrow at Scott's, and will now be prepared to reassemble the engine.
Also on the books for tomorrow is disassembly of the head and grinding the valves. Scott has the equipment to do that right in his shop. We'll see how everything looks.
While the engine work has gone on, I have not been idle. I don't have pictures tonight, but will get some before starting reassembly. The tractor is currently completely broken down from in front of the transmission forward. The trans is on blocks with the input shaft sticking out the front...and nothing else! It does look rather strange. The center frame, instrument panel housing, and dash panel have all been sandblasted and painted. I'm just giving the paint some time to harden before reassembly.
Also on the agenda before reinstalling the engine, the clutch disk and pressure plate have to be replaced. Spreading the costs of these repairs has been part of the reason for the slow progress.
November, 2002 - My poor tractor has been gathering dust in the barn all summer! Anyhow, further updates. Last fall after examining the head, it was found to be cracked, and the valves, seats, etc. were beyond repair. The best course of action was to replace the entire head with a new complete unit, with new valves installed and all. That was purchased and has been awating installation. This last spring a new pressure plate, clutch disk, and pilot bearing were purchased. (NOTE: When doing work on the clutch and replacing clutch parts, be sure to do a careful reading in the service manual about the difference between pressure plates that use cushion springs, those that don't, and what clutch disc to purchase!) The pistons, cam, and crank have all been installed in the engine block.
This was about when I started making my job changes. So unfortunately nothing has happened all summer.
May 26, 2003 - The dust has grown thicker. For those of you following this project, you haven't missed anything. I've hit one of those points in life where several other higher priority things (like earning a paycheck) have intruded on a project. Please be patient!
(More information and pictures will be coming as this project progresses. Click here to see project costs to date.)